Hi There!
So today I'm going to share my nail of the day. For this design you'll need three different nail colours that you like, and a top/ base coat if you choose. You will need some tape, scotch tape works best - the first time I used tape for nail designs I used masking tape and all I can say is, very messy. You will also need a small tool for making dots, like a toothpick.
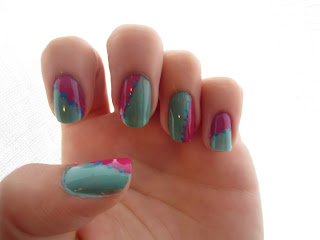
Here is my Nail of the Day:
How To:
1. Start with bare nails, remove any old nail polish. Choose the first colour you want to use and paint your first coat, usually I would put a pink before a blue but this pink is deep and opaque, while the blue is a bit more liquid and clear. Once you finish your first coat let your nails dry, you'll want to have them dry before taping them. :)
2. Get an idea of where you want to section off your nails, I did mine at random and the result didn't flow as well as I would have liked heh. Tape your nails so that tape is covering the area you want to stay the first colour. If you notice in the picture, the tape on my nails has a few bubbles along the line, you're going to want to smush those down to create the flattest line possible.
3. Choose the next colour you want to use overtop of your first coat. Paint the exposed part of your nail with the second colour. Peel it off slowly!
4. Now each of your nails will be sectioned in two colours, the line between the two colours will be obvious and all you have to do is dot the line with your third colour! You can make the dots however you want. For the dots I apply some nail polish from the brush onto the tip of the toothpick.
5. Use a top coat for extra shine, let dry and voila!
You're done!
(Sorry for the lack of pictures but I explained the steps as best I could.)
The colours I used:
Wednesday by Zoya
Fuchsia Fever by Revlon
and last but not least,
Dusty Blue by Love&Beauty (Forever 21)
This design is really fun and vibrant, and I enjoyed it, hope you did too!
:)


Lovely design and colours *___*
ReplyDeleteAww, Thanks so much!! n.n
ReplyDelete